How to Install Concrete Roof Tiles
Installing concrete tile roof is quite a laborious and difficult process which needs great preparation and planning before the actual installation. Be it you are replacing a roof which is damaged or installing a brand new roof, you need be aware of how to do it technique. Below is a guideline on how to install concrete roof tiles.
Project planning
At this stage there are some aspects which you put into consideration. The first factor is the tile type you would like to use but for this case its concrete tiles. What you should consider at this phase is the tiles color as some are prone to fading faster as compared to others.
Also as you think of working on a tile roof just like any other roof type safety should be part of your preparations. Safety in this context would mean someone to aid in holding in place the ladder while you are working and also be able to pass you the tools you need for the work. While cutting any material use glasses to avoid any object from getting into the eye.
At the preparation stage also gather all materials and tools which you would need in a single place to cut on time which you would spend descending the ladder each time to go pick. Attach the diamond blade for cutting on the saw. Cross check the roofing kit ascertaining that anything that would be needed is in place.

Get the installation work started
The following steps are involved in this phase:
- Removing the former roofing if any.
- Installation of underlayment
Position at one roof’s side a roll of underlayment perpendicular to roof’s eave. Roll the underway while keeping bottom edge in line with eave’s edge maintaining it above any synthetic or metal edging which may cover eave’s border. Secure laid underlayment using nails at a separation distance of 24’’ interval. The nails to be at least 2’’ above the roof edge. At the roof end cut the roll of underlayment such that it matches edges then secure using nails.

Actual installation of tiles
Install battens
Battens are the thin material strips either plastic metal or wood about 2’’ wide and 1’’ thick placed horizontal alongside the roof’s length. They are used on roofs with steep slopes for holding the tiles. Concrete tiles come with hook which hangs on such battens. In order to determine the spacing between battens, test it using tow tiles. After determining the distance maintain it.
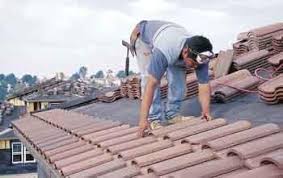
Install tiles
Start your tiles installation on one side then move alongside roof’s length. If there are no battens, nail directly the tiles into sheathing. But if battens are already installed first nail into battens then tiles then using clips anchor onto the battens the tiles. For interlocking tiles, nail tiles to battens or sheathing.
For tight spots cut the tile
Obstacles such as chimneys will find their way and with tiles they will be cut such that they fit around those areas tightly. And also each row’s end tiles will also be cut.
Ridge tiles installation
After tiles installation on roof’s broad surface the tops need special capping with ridge tiles. Ridge tiles are round in shape and as per their design they can either be laid in overlapping or end-to-end style.
Before you consider going for roofing using concrete tiles it is recommended that you consult roofing contractor professional because an error made while installing or choosing the material type to work with can mess you up. Concrete tiles work well for severe weather and also the material is durable generally.
HOW TO PAINT A TILED ROOF
What are roof tiles?
Roof tiles are usually made from cement or from clay (less common).
Cement tiles are prone to carbonation due to the effects of carbon dioxide and water in the atmosphere that form a very weak acid called carbonic acid, which extracts the cement from the surface of the tiles and produces a weak, friable surface layer. As cement roof tiles age this becomes more severe.
While clay tiles do not have this problem, they do tend to be highly porous, resulting in poor paint film curing.
Surface preparation:
Surface preparation is the critical part of any painting project, with poor preparation being the principal cause of coating failure. The object of surface preparation is to provide a strong surface bond before applying any paint. Both tile types can be prepared as follows:
Wash the surface thoroughly using water and a strong brush. This should remove all loosely bound sand particles and any poorly adhering paint coatings. Use of a high-pressure water jet is recommended.
Rinse the roof with clean water and then leave it to dry out. The moisture content, which can be measured using a moisture meter, should be below 15%.
Check the adhesion of any existing paint coatings by pressing adhesive tape (e.g. masking tape) onto the dry surface. Pull the tape off the surface and inspect the underside of the tape.
- If no coating has come off, and there is no dirt or chalky material visible on the tape then the surface is suitable for painting.
- If the surface is chalky or a powdery layer is visible on the tape apply a quality Bonding Liquid.
- If sandy particles are removed the surface is friable and the surface must be rewashed.**
- If the paint coating comes off, the surface under the coating is weak and should be stripped, and the cleaning process repeated.
Check the porosity of the surface before painting by applying a droplet of water.
- If it is easily absorbed into the tile then the application of a quality Bonding Liquid, to seal any residual particles, is recommended.
- As it may not be possible to remove all sand particles the application of a quality Bonding Liquid, to seal any residual particles, is recommended.
- If a quality Bonding Liquid has been applied to the surface, it must be left to harden for at least two to four hours before continuing.